Wednesday, October 27, 2010

The New York Food Tour-Day 6: Eataly and Hill Country Chicken

Day 6 was another twofer, with a delicious panino from Eataly, finished off by pie from Hill Country Chicken.

Eataly is Mario Batali's latest entry into Italian cuisine. It's an interesting mix between a specialty Italian grocer, and Italian restaurants. Different dining sections are dispersed between the aisles of great food. Choosing among the pork, fish, vegetable, pasta and pizza, coffee, panino, pastry, and gelato bars was one of the toughest decisions of the night, but in the end, we went with the panino bar. We had a pressed soppressata and provolone panino, which had a satisfying spice from the soppressata. The panino was pressed to perfection, and worked well with the fresh ingredients.

The grocery items were high quality, but be prepared to pay accordingly. Eataly has drawn crowds since its opening earlier this year, so be prepared to hunt for a table and go elbow to elbow while you search for the perfect taleggio or caffe.

Next stop: Hill Country Chicken, the brain child of Hill Country BBQ. We didn't try the chicken, but we did fill up on three mini, 3 inch pies; banana cream, cowboy pie, and apple and cheddar pie. The banana cream pie was fantastic and had a good banana base with a mountain of whipped cream. Out of the three pies, it was definitely our favorite because it carried just the right balance of decadence.


The cowboy pie was a mess of caramel chipschocolate chips, held together by caramel in a graham cracker crust. It was a rich mixture that melted in your mouth. It would have been great served warm with a scoop of ice cream. The apple and cheddar pie only offered a hint of the savory cheddar, but the apples were sweet and perfect for the buttery crust. Hill Country Chicken recreated a 1950s style diner on the upper level, while the lower level was a freakishly amazing replication of a basement you would find in any home in America in the '50s. It was complete with vinyl chairs, Lite Brites, and faux wood paneling. Overall a pretty enjoyable experience.

Tuesday, October 26, 2010

The New York Food Tour 2010-Day 5: Vanessa's Dumpling House

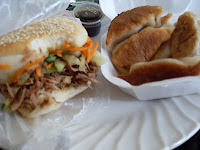
Day 5 was a cheap eats day, courtesy of Vanessa's Dumpling House. Today's lunch hunger was satiated by a sesame pancake sandwich stuffed with roasted pork, carrots, and cucumbers AND an order of five, fried pork and chive dumplings. Pork overload! Everything was great and was all under $5. The dumplings are made right in the store and taste fresh and are fried to perfection. The sandwich was equally tasty, but made tastier with the provided hot sauce. The sesame pancake is great, and the vegetables give way with a satisfying crunch.

The location doesn't offer a lot of seating, so try to avoid the lunch rush, or have a good alternative spot to go and enjoy your dumplings.

Sunday, October 24, 2010

Reinventing Crispy Rice Treats

Everyone loves a fresh Rice Krispie treat. I decided to put a bit of a twist on it by using Marshmallow Fluff...Strawberry Marshmallow Fluff! The Fluff adds a bit more sweetness to the treats and the strawberry flavoring doesn't add much to the flavor, but it sure does look cool. If you can't find pink fluff, pink marshmallows could also do the trick. This is a very fun and cheap dessert that's designed to share with a group.

Check the ingredients below:

  • 3 tablespoons of butter, with more for the serving dish
  • 5 cups of crispy rice cereal
  • 1 jar of Strawberry Marshmallow Fluff OR 1 package (10 oz) of regular sized, pink marshmallows
Prepare a dish with cooking spray or butter for the treats.

Melt the butter in a large pot, then add the fluff. Be warned though-fluff is tough to work with and is very, very sticky. A silicon spatula with a spoon for scraping works pretty well. Once the butter and fluff are mixed together, take the pot off the heat and add the crispy rice cereal, stir until the fluff and cereal are well mixed. When it's cool, cut into squares and enjoy!

The New York Food Tour-Days 3 and 4

Days 3 and 4 were definitely not light carb days. Day 3 took us to Brooklyn for some delicious Mexican food from Calexico. What started off as delicious food from a cart blossomed into a full fledged casual, brick and mortar restaurant. From the cart on Wooster and Prince, I knew to order the pulled pork quesadilla, but also shared their specialty, the carne asada taco. Both did not disappoint, and the side of crack sauce just enhanced the whole experience. Both the pork and the steak were cooked perfectly. Another notable menu item, only available at the restaurant, was the torta. The Mexican sandwich was full of pulled pork with pickled red onions, lettuce, and tomato. The restaurant is a casual affair with very reasonably priced items. You order at the counter and wait it out for a seat, but be warned that it's very popular so you may wait a bit for a seat.

Take a peak at the Calexico site: http://www.calexicocart.com/page/page/4364476.htm

Day 4 brought a great breakfast, courtesy of Murray's Bagels. Unlike other delis, Murray's does not toast the bagels. Instead, they allow the bagel to speak for itself. I went for the delicious whole wheat bagel with cream cheese, though they had a variety of whole wheat bagels, from whole wheat everything bagels to organic wheat. The bagel had a great texture and the whole wheat was very flavorful. However, we also had a delicious sandwich with salmon, capers, tomatoes, and cream cheese on a poppy seed bagel. Fantastic fresh salmon marinated in what tasted like dill was the center piece of the sandwich. Everything was well balanced and very fresh.


Check out the Murray's site: http://www.murraysbagels.com/index2.htm


Friday, October 22, 2010

The New York Food Tour: Day 2-Torrisi Italian Specialties


The food tour continued today with a lunchtime visit to Torrisi Italian Specialties. It's a fairly new addition to the SoHo restaurant scene, but it's made quite the impression. The dinner menu changes daily, and the management is fairly strict on the no substitution rule. The space is pretty tight, so be prepared for a wait at either lunch or dinner. I can't speak for the dinner fare, but lunch was delicious.

For lunch, you can just walk up to the counter and order your sandwich. Everything smelled great and they were making the eggplant parmesan sandwich, but I went for creating my own. They have a standard collection of meats, and I created a mozzarella, roasted red pepper, and soppressata sandwich on a hero with a little oil and vinegar. Everything tasted quite fresh, though I do wish the bread was a bit crustier. It was a pretty standard hero roll with sesame seeds. However, it was a really satisfying sandwich.

Check out the Torrisi website at: http://www.piginahat.com/

Can't wait for day 3!

Thursday, October 21, 2010

The New York Food Tour 2010-Day 1 Baohaus

The Galley Kitchen is moving to San Francisco! But with New York being home to so many different types of food, from the very humble street cart to fancy, Michelin starred eateries, I couldn't leave without taking one last bite (trite, but you have to admit...a little funny) out of the Big Apple.

Today was day 1 of the New York Food Tour and the first stop was
Baohaus, home to the Authentic Taiwanese Gua Bao-steamed bun sandwiches. These aren't sandwiches in the American sense-the bun is a more taco-shaped, soft, doughy bun. Baohaus has a great selection of fillings. I hungrily ate the Chairman Bao-a delightful sandwich with "all natural Berkshire Pork Belly," garnished with crushed peanut, cilantro, Haus relish, and Taiwanese red sugar. All the flavors blended quite well, though I do wish there was more relish. It was a good complement to the savory pork belly. One bun is a good snack, but I think two would satisfy the lunch hunger.

They also offer a vegetarian bao with fried organic tofu. Fun for all!

Check out the Baohaus website: http://www.baohausnyc.com/.

Friday, August 6, 2010

Reinventing: Strawberry Icebox Cake

The Kitchn recently posted a few no bake desserts and the recent heat wave definitely put me off turning the oven on. The strawberry icebox cake (original recipe here ) caught my eye. The recipe calls for regular graham crackers, but I used Trader Joe's Cinnamon Graham Crackers and it gave the dessert a really great flavor. I also used the homemade whipped cream recipe.
  • 2 pounds of fresh strawberries
  • 1 serving of whipped cream
  • 1 16 oz container of Trader Joe's Cinnamon Graham Crackers
Slice the strawberries thinly and set aside. Make the whipped cream. In a 9x13 inch pan, lay down a layer of whipped cream. The next layer should be the graham crackers, with two at the top laid width wise, followed by 2 rows of three laid length wise, then the last two at the bottom width wise. Throw another layer of whipped cream on there, followed by strawberries. Keep layering, finishing with a layer of strawberries. You should have three layers. Cover the dish and refrigerate for a minimum of 4 hours. The time in the fridge softens the graham crackers and blends everything together.

This is a great dessert to make in a small kitchen. You use a minimal amount of dishes and counter space. By my count, you only use the 9x13 dish, the bowl for the whipped cream, a knife and a chopping board. Minimal amount of stuff for a pretty summer dessert.


Saturday, July 31, 2010

Just desserts: Whipped Cream

Whipped cream is surprisingly not a misnomer. It is literally whipped heavy cream. Fresh, homemade whipped cream adds a richness to a dessert that most store bought whipped cream is missing. It's super easy and takes about 10 minutes with a hand mixer.

  • 3 cups of heavy whipping cream
  • 1/3 cup confectioner's sugar
  • 1 teaspoon vanilla extract
With a hand mixer on low, whip the cream until it forms soft peaks. Beat the sugar and vanilla...and that's it.
Make sure you use a glass or metal bowl to keep the cream cool.

I find this is cheaper than buying the pre-made stuff and only requires a small bit of effort. And in a small kitchen, this is a very easy dish as it only uses one dish!

Sunday, July 18, 2010

An Ode to Siracha

I'm usually not one for product placement, but in the past years I've come to appreciate certain items that have become pantry staples. Siracha slowly but surely worked its way to the top of the pantry pyramid. For those unfamiliar with it, Siracha is a devastatingly simple Thai hot sauce made with various chili peppers, vinegar, and garlic. The spice is a slow burn and adds a very distinctive heat to any dish. Its simplicity is the key to its versatility.

Now without further ado, a list of things that have been made better with Siracha:
  • ketchup: mix the two together for a kicked up dipping sauce
  • egg: a way to jump start the day
  • stir-fry: mix it in as one of the last ingredients to give the dish some spice
  • hummus: instead of (or in addition to, if you want to set your mouth on fire) red pepper sprinkled on the spread, mix in some of the sauce for a tangier version
  • BLTs: mix it in with the mayo for a different take on the classic sandwich
  • macaroni and cheese: adds a touch of zing to the creamy dish
  • marinara sauce: again, a simple way to spice things up
These are just the things I did today-anyone else slightly obsessed with this hot sauce? This sauce is definitely worthy of your valuable cupboard real estate.

Look for the very distinctive green topped bottle in
international markets, and in the international section of most grocery stores.

Monday, July 5, 2010

Summer time: Sweet Tea

Coming from the South, a glass of sweet tea is the way to welcome summer. Summer heat waves don't stand a chance against home brewed tea and fresh simple sugar.

To brew the tea:
  • Black tea, such as Lipton
  • 1 tea bag per 8 oz of water
Boil the water and steep the tea for no longer than 5 minutes, otherwise it's a bit strong (Thanks for the tip, Ben!). Cool in the fridge for about 5 hours.

For the simple sugar:
  • 1 cup of water
  • 2 cups of water
To make more, keep the sugar to water ratio 2:1. Make sure the water is at a full boil before adding the sugar. Stir constantly to make sure it dissolves. You'll know that the syrup is ready because it will feel thicker as you stir. Once all the sugar is dissolved, take off the heat and store in a sealed container. A word of warning, if you keep the sugar on the heat for longer, it will turn out too thick.

For a 6 cup pitcher of sweet tea, we added roughly 6 tablespoons of the simple sugar. Add more or less according to taste.

I used the same pot for brewing the tea and making the simple sugar thinking it would be tea infused. I couldn't really taste a difference, but it did make the syrup not as clear as it would normally appear.


Wednesday, June 30, 2010

Just Desserts: Dulche de Leche

Chemistry is a wonderful thing. 1 15 oz can of sweetened condensed milk + 1 pot of water + 3.5 hours = dulche de leche. Seriously.

Dulche de leche is similar to caramel, only in a more jelly form. It's a traditional Spanish dessert, but not to be confused with flan. A diverse dessert, it can be used as a garnish or eaten alone.

Take your standard can of sweetened condensed milk and take the label off. Make sure the can is submerged in water the whole time-THIS IS REALLY IMPORTANT OR THE CAN WILL EXPLODE!

Cover the pot and keep at a steady boil for 3 hours. Then turn off the heat and keep covered for 30 minutes. Open the can and enjoy!

This is particularly tasty when paired with fried plantains.


Tuesday, June 29, 2010

Cook & Tweet

A bit late to the party, but follow us on Twitter: @GalleyKitchen

Periodically we'll be live cooking on Twitter-watch as we try not to burn the kitchen down!

Wednesday, June 23, 2010

Kitchen Envy

Wired posted a jealousy inducing kitchen makeover. If only we could all be so lucky!

The description from Wired:
"The Euro decor was more Cuisinart than haute cuisine, and his foodie spouse demanded better tools. Enter the professionals at Creative Concept Builders SF and Nicole Hollis Interior Design, who cooked up an ingredients list focused on eco-friendly appliances and locally sourced materials.
"

Wired Makeovers: Kitchen


Sunday, June 6, 2010

Weekend Meal: Turkey Taco Bake

The name is a bit deceiving, as this is really more of a turkey taco slow-cooker dish. It's an easy, thrifty meal. Beef also works, but it makes for a fattier meal.
  • 1 lbs. ground turkey (or beef)
  • 1 10.75 oz can of condensed tomato soup
  • pico de gallo
  • 1/2 cup of milk
  • 1 package of 8-inch flour tortillas sliced into 1-inch pieces
  • shredded cheese
  • sour cream
  • 1 package of corn bread
Cook the meat until browned and pour of any fat. Stir the soup, milk, and tortilla pieces into the skillet and place into a slow cooker. Cook for about 4-5 hours on low.

Serve with corn bread and tortillas.

Weekend Meal: Stir-Fried Tofu, Shiitake Mushrooms, and Snap Peas

Sometimes a veggie meal is the way to go. You feel a little healthier and are able to gorge yourself on more dessert. This tofu stir fry is from the always reliable Cooking Light. Originally, the recipe called for Chinese peas, but I swapped those out for snap peas for thrift's sake.

  • 1/2 Tbs. julienne-cut peeled fresh ginger (less if you prefer a less ginger taste)
  • 1/2 tsp salt
  • 1 tsp cornstarch
  • 1 Tbs. canola oil
  • 2 cups thinly sliced shiitake mushroom caps
  • 1 cup snap peas
  • 2 Tsp red chili paste (more or less, depending on your tolerance of spicy food)
  • 1 package (12.3 oz to 14 oz) extra firm tofu, drained and cubed
  • 3 Tbs low-sodium soy sauce
Combine ginger and 1/2 tsp salt in small bowl and let stand 5 minutes. rinse ginger with cold water, and pat dry. Then combine the ginger with cornstarch.

Heat the oil in a large nonstick skillet and add mushrooms and cook until tender. Add ginger mixture, snap peas and chili paste and fry for 2 minutes. Add tofu, fry 1 minute then add soy sauce and fry for 2 minutes. Serve over white rice.

This isn't a very cost effective meal, as the mushrooms are pricey, as is buying the chili unless you already have it on hand.

Sunday, April 25, 2010

Dessert: Chocolate Malt Pudding

I'm going to put this out there: pudding is really easy to make. This chocolate pudding takes about 10 minutes. You can serve it right out of the pan warm, or you can refrigerate it and serve it cold. I like to use high quality chocolate, as the chocolate makes up the majority of ingredients of this dish.

  • 1/4 cup malted milk powder (Ovaltine works)
  • 5 Tbsp. sugar
  • 1/4 cup cornstarch
  • 2 1/4 cups half and half
  • 4 oz semi sweet chocolate, finely chopped
  • 1 tsp. vanilla extract
  • Malted milk balls, for toppings
Whisk together malted milk powder, sugar, cornstarch in pan. Whisk in 1/2 cup of the half and half until it's smooth. Add the remaining half and half and cook the mixture over medium heat, whisking constantly until it thickens. (this happens pretty dramatically, and the mixture will take the consistency of pudding)


Remove the pan from heat and add in the chocolate. You can serve it now or put it in the fridge. Easy peasy.

This is a pretty cheap dessert, depending on the type of chocolate you purchase.

Monday, April 5, 2010

Carrot Nut Bread

Another classic recipe from The Joy of Cooking. Making bread satisfies all kinds of food requirements: breakfast, snacks, maybe even dessert. This one makes me feel kind of healthy as it uses carrots and either pecans or walnuts. You'll need a 9x5 inch loaf pan.

Ingredients:
  • 1 1/2 cups all purpose flour
  • 1 tsp baking soda
  • 1 tsp baking powder
  • 1/4 tsp ground cinnamon
  • 3/4 cup sugar
  • 2 large eggs, beaten
  • 1/2 cup vegetable oil
  • 1 tsp vanilla
  • 1/2 tsp salt
  • 1 1/2 cup grated carrots (a food processor with the right attachments makes this easy to do)
  • 1 1/2 cup chopped pecans
Whisk together the flour, baking soda, baking powder and cinnamon. In a separate bowl, blend sugar, eggs, vegetable oil, vanilla and salt. Stir in the dry ingredients. Then, mix in with a few strokes the carrots and pecans.


Pour batter into greased loaf pan. Bake until the bread pulls away from the sides (for me, that was about an hour). Cool the bread in the rack for about 10 minutes before taking it out of the pan and cutting.

I topped this with cream cheese frosting and left over pecans, but it is also good alone.


Sunday, March 7, 2010

Dessert: Meringue Kisses

Simple and tasty, meringue cookies are a satisfying snack. The ingredient list is short but the process is sticky and lengthy. Here's the classic Joy of Cooking meringue kisses recipe:

  • 3 large egg whites
  • 1/4 tsp cream of tar tar
  • 1/4 teaspoon salt
  • 3/4 cup sugar
  • 2/4 tsp vanilla
Pre-heat the oven to 225 degrees.

Beat in a medium glass or metal bowl the egg whites, cream of tartar and salt until foamy. Increase the speed to high and beat the mixture until it beings to form soft peaks. Gradually add the sugar and keep mixing until well combined. Reduce the speed to low and add the vanilla. Beat until the meringue is glossy and stands in very stiff peaks.
Line 2 cookie sheets with wax paper, or leave ungreased. You can use a zipper topped plastic bag to pipe the meringue into 1 1/4 inch drops, or use tablespoons to drop the batter. Make sure they are about 1 inch apart.

Bake for 45 minutes, rotating the sheet half way through. Turn the heat off and leave the meringues in the oven for about 30 minutes, or until cool.

Tuesday, February 16, 2010

Food for Thought: Brand Names vs. Store Brands

Some interesting reading from Consumer Reports discussing the age old question, store brand or brand name?

I've always kept a close eye on the grocery bill and will usually opt for the store brand when given the choice. However, when I'm making a dish that has just a few ingredients, I like to go with the brand name; quality vs. quantity and all that.

Just a thought to keep your mind grapes from souring.

Sunday, February 14, 2010

Dessert: Cream Cheese Brownies

Combining two of my favorite things, chocolate and cream cheese, these brownies really hit the spot. I took this recipe from Cooking Light and tweaked it a bit. Their recipe calls for making your own brownies, but I cheated a bit and just used brownies from a box. Probably made this not so "light," but nonetheless, they were delicious and easy to make.

For my cheaters recipe, just follow the brownie instructions on the box. For the cream cheese topping:

  • 1 (8-ounce) block 1/3-less-fat cream cheese
  • 1 tablespoon cornstarch
  • 1 teaspoon vanilla extract
  • 1 (14-ounce) can fat-free sweetened condensed milk
  • 1 large egg

And per Cooking Light: "To prepare topping, place cream cheese in a large bowl; beat with a mixer at medium speed until smooth. Gradually add cornstarch and remaining ingredients; beat until smooth. Spread evenly over batter. Bake at 350° for 35 minutes or until set. Cool in pan on a wire rack."


Snacks: Yogurt Covered Pretzels

Because these are covered in yogurt, I like to think of these pretzels as being a healthy-ish snack option. I used salted pretzels, but I'm sure these would be just as good with saltless pretzels. This is an easy but slightly time consuming recipe. Using strawberry and vanilla yogurt gave me a nice Valentine's Day variety.

  • 1 lbs bag of small pretzels (salted or unsalted)
  • 2 cups vanilla or strawberry yogurt
  • 5 cups confectioners sugar
Equipment needed:
  • Wire rack
  • Cookie sheet
  • Tongs

Preheat the oven to 250. Place the wire rack on top of the cookie sheet and set aside.

Mix together the yogurt and sugar, adding the sugar 1 cup at a time until well blended. Refrigerate for about an hour. I found that the cold mixture coats the pretzels better.

Immerse a few pretzels at a time in the yogurt and sugar mixture. Using the tongs, place them on the wire rack and do not stack the pretzels for fear of soggy snacks.

Turn the oven off and place the pretzels in the oven. Apparently, the heat will help harden the frosting but keep the pretzels crunchy.

Leave the pretzels to harden, which will take 4-5 hours.

Healthy Meal: Grilled Tuna with Basil Butter and Fresh Tomato Sauce

I'm new to the fish fad, but this tuna dish has helped me see the light. This is straight from the Cooking Light recipe box, so you know it's both healthy and delicious. Admittedly, this is neither a cheap, nor easy recipe, but the effort is certainly worth it.

Basil Butter:
  • 3/4 cup basil leaves
  • 2 Tbs butter, softened
  • 1 Tbs fresh lemon juice
  • 1/4 tsp salt
  • 3 minced garlic cloves
Tomato Sauce:
  • 2 tsp olive oil
  • 1/2 cup finely chopped red onion
  • 2 minced garlic cloves
  • 3 cups of cherry/grape tomatoes, halved
  • 1/2 cup dry white wine
  • 3 Tbs capers
  • 2 Tbs balsamic vinegar
  • 1/4 tsp sugar
  • 1/4 cup chopped parsley (I skipped this, but feel free to add)
Tuna:

  • 4 6 oz tuna steaks
  • 1/2 tsp salt
  • 1/4 tsp pepper
  • Cooking spray
You get to use your grill pan for this recipe, so here goes:

"To prepare basil butter, combine first 5 ingredients in a food processor; process until smooth, scraping sides as needed. Set aside.

To prepare sauce, heat oil in a saucepan over medium-high heat. Add onion and 2 garlic cloves; sauté 3 minutes. Add tomatoes; sauté 2 minutes. Stir in wine, capers, vinegar, and sugar; bring to a boil. Reduce heat; simmer 5 minutes, stirring occasionally. Stir in parsley. Set aside.

To prepare tuna, sprinkle tuna with 1/2 teaspoon salt and pepper. Place tuna on grill rack or broiler pan coated with cooking spray. Cook 5 minutes on each side or until desired degree of doneness. Serve with sauce and basil butter. Garnish with basil leaves, if desired." (from Cooking Light link above)

I served this with a side of white rice and steamed broccoli:

Weekend Meal: Chicken Enchiladas

Mexican food is easily one of my favorite to make. It's simple, usually pretty easy, and uses some great fresh vegetables. To garnish these enchiladas you can use your homemade pico de gallo or jar salsa, whichever suits your mood.

  • 20 flour tortillas
  • 1-2 lbs chicken breast, cubed
  • 1/2 tsp each of: salt, pepper, paprika
  • Shredded Mexican cheese blend
  • 1 container (however big, depending on your love/hate of it) of sour cream
  • Tomato, lettuce for garnish, if desired
  • Cooking spray
Pre-heat the oven to 350 degrees.

Season the chicken with salt, pepper, paprika. Coat a pan with cooking spray and brown. Lay out the tortillas and fill with the chicken and other desired fillings (tomato, lettuce, sour cream, beans etc).

Coat a 13x9 glass pan with cooking spray and lay out your rolled enchiladas. Top with cheese (and pico, if using) and bake for about 15 minutes, or until the cheese is bubbly.

Favorite Side: Pico De Gallo

I feel pretty healthy whenever I make pico de gallo. There's nothing in it other than some fresh vegetables and a squirt of lemon juice. The official ingredient list below:

  • 6 plum tomatoes, quartered
  • 2-3 jalapeno peppers, seeded
  • 1 medium yellow onion, quartered
  • salt and lemon juice to taste
  • 2 medium sized cloves of garlic, minced
Take out your handy food processor and pulse the garlic and salt, until they are minced to your liking. Place in separate bowl.

Pulse the tomato pieces until chopped, but not too juicy. Place in bowl with garlic and salt.

Next, pulse the jalapenos and onion until they are as big/small as you want.

Mix all the ingredients together, squirt in some lemon juice and enjoy with your homemade tortilla chips.